April 5, 2019

The Lego Client

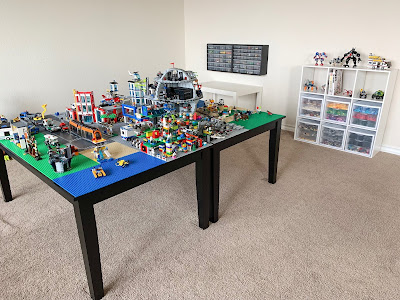
I recently completed a project for a client who seriously needed Lego storage. Like I do for all clients, I presented my ideas and we worked together to find the solution that worked best for him. My client is 6. I may not have charged him for my time, but he did pay for some of his new design. We worked hard together. We even bonded over the week it took us to sort through it all. I loved watching his excitement in finding a new home for each piece. Most of all, I love that I won't have anxiety anymore when I walk into this room which used to have a hodge podge of bins ALL OVER the floor. Project: Get it off the floor. Mission complete.


I captured a pic of us toward the end of our sorting. My client decided where he wanted everything. I know this was his favorite part.


This little sweetie is a Master Builder. In the midst of the organization, he decided to buy himself a second Lego table. In December 2016, I posted a DIY Lego table. I used the same system to create this second one (see DIY post for step by step). I cut the legs down from a dining table. I used a retractable utility knife to cut some base plates, so it would fit perfectly. BEFORE you gorilla glue the pieces to the table, you MUST attach with Lego bricks to space them properly. Don't skip this step! Place a heavy book on each plate to keep it pressed down. That's it!


White Bookshelf - Target
White Working Table - Pottery Barn Kids
Black Craft Hanging Cabinet - Amazon
Clear Storage Drawers - Target ONLINE only


November 30, 2017

Spoil Your Teacher

It’s our first year in school. I, somehow, managed to let go of my only child entering Elementary school. When I was chosen to be Room Parent, I was on cloud 9. When my son’s teacher turned out to be amazing, I was overjoyed. I knew right away that I wanted her holiday gift to be special. It was only September, and my wheels were already turning.

A week before the Thanksgiving holiday, I sent an email to the parents in our class. I invited them to participate in a class gift card tree for our teacher. We’d present it to her at our Kindergarten holiday party. At the beginning of the year, I sent out a copy of her favorite things to all the parents. I used this list to put together 6 of her favorites. There were 3 slots available for each item (Starbucks, a nail salon, Sephora, her favorite clothing boutique, 2 restaurants). Parents signed up by responding. More than half participated. That’s a great turnout! And it sure is a lot better than her receiving 22 Starbucks gift cards. I’m currently collecting the gift cards, and the tree is adorable!

The guidelines are:
~Please write the dollar amount on back of gift card. Please do not write your name.

~There is no dollar minimum or maximum. Please give what you’re comfortable with.

I’m confident this is one of the most awesome gifts a teacher could ask for. And our teachers deserve it!!

Since it’s my first year to do this for a teacher, I have the gift card tree with one gift card. It gives you the idea! I’ll post a pic after the tree is full.

Tree purchased from At Home for $16.99

Hot glue gun used to glue 10 lb Hemp Cord from Michael’s to back of gift card. 


Final pic coming by December 15, 2017!

{UPDATE} The tree was perfect. I know she loved it. Who wouldn't?


January 17, 2017

Allowance Teaches Money Management

There are several approaches to paying your child an allowance. Parents also take into consideration what age to start and how much to give. Some approaches are:
* Chores for money - completing chores in exchange for money or a list of chores with a set price per chore.
* Give a regular amount of money weekly, bi-weekly or monthly without requiring the child to earn the money.
* Contribute to the family by doing certain chores around the house for free and get paid for larger chores or tasks.
All approaches have their pros and cons. It's whatever works best for your family.

When my son was 3, we encouraged taking gift money he received to the bank. He walked in, handed his money to the teller and got a lolliop. We explained what money in the bank/his savings account meant as best we could. When he was 4, I started going to the drive thru ATM for deposits. After making the ATM selection, I would pull up a little so he could deposit his money in the ATM. He understood the meaning of money well enough and knew he could buy things when he was given money. We explained saving money sometimes, and why, and spending it sometimes. He grasped the concept well enough.

He was given money at Christmas when he was 4 1/2, and he was quick to say he was buying a Lego with it. Since money came from 2 people, we encouraged taking some to the bank for his savings account and keeping some for whatever he wants to buy. He agreed and decided he wanted to save his spending money to buy the $500 Lego Death Star. Ummm. OK. I guess we all need goals.

Since he has a good understanding of money, and willfully makes deposits to his savings account, we decided to implement an allowance. Scott and I gave it a lot of thought. Our son was putting away his clean laundry, on his own, when he was 3. He sets the table, folds towels, helps put away mine and Scott's laundry, etc. Scott and I feel like these things are part of contributing to the family. We wanted to come up with harder tasks for our 4 year old son to earn his money. After much consideration, we decided to pay him $4/week to sort all the dirty laundry on Monday (with my guidance) and to clean the gameroom on Friday. Neither of these tasks are easy or quick. I agree that these are things we do to contribute to the family, but we had to start somewhere. We'll re-evaluate the system as needed.

We told him the concept of an allowance for several days leading up to the big day. It was Monday, and he knew we were going to discuss it, as a family, at dinner. We took one bite of food, and he, very excitedly, asked, "So are you ready to talk about money, guys?!" We explained our expectations of contributing to the family like he already does, what chores he could do every week to earn his $4, and how a portion of it would go to savings and his own spending money. He was excited. We all agreed how much he would designate to savings and spending. If he doesn't do his 2 chores, he doesn't receive the money. Scott and I discussed with each other how his earned money should not be taken from him, or used as a threat, for bad behavior.

I made 2 mason jars for him to put his money in. We'll create a charity jar some day. Since the words savings and spending look similar, I chose to use the word bank. When the bank jar gets full, we'll make a bank deposit run. When I give him some of my coins, he will run to put some in the bank jar and some in the spending jar. I love that it's already a habit, at 4 years old, for him to put money in savings.

Our son knows his numbers and the concept of greater than and less than. He doesn't know the value of coins, so this is a great opportunity for us to start teaching him. Some people feel that a child should be given an allowance when they can count money and not sooner than that. That wasn't the case for our family. Our son has a lot of grandparents and loved ones, and he is constantly receiving. I never anticipated giving an allowance to a 4 year old. It just seemed like a good way and a good time, for our family, to start teaching money management. We want our son to stay humble, and we want him to know it's a privilege to be given money, clothes or toys. We want him to understand money isn't free, to be able to make the decision to buy something with his hard earned money, and to get used to saving a portion of every thing he earns. I think the shock of taxes can come later.


December 1, 2016

For the lego lover: DIY lego table

This Lego table was one of the most exciting ideas and creations I've had. I am extremely happy with the way this project turned out. It will be around for many, many years.

My little guy became obsessed with Legos when he turned 4. We enjoy building a new Lego creation from instructions, and we enjoy creating together. Legos has encouraged more creativity and imagination. So I set out to find a large Lego table for future Lego creations. I was inspired by the Lego Movie and knew exactly what I wanted.


I started my search, but I could not find the table I had in mind. Every Lego table I found was too small and expensive. I decided to make my own. I spent weeks searching for the right sized dining table at the right price. I finally found the table on jet.com. It's fun watching the price drop after it goes in your cart! It was listed for $128. I paid $109, no tax, free shipping. The table measures 60L x 36W x 30H inches. Thank you, Jet.com!
https://jet.com/product/Homelegance-Tibalt-Black-Dining-Table-60-in/db38cebd98984cfdbb2d64d1f038abb7


I cut the 30" legs down to 24" high with the help of a circular saw and screwed the legs in with the screws and tool that came with the table. The table took 15 minutes for one person to put together. I went for 24" H on the legs, because it gives him room to grow with it (he is 42" tall), while still allowing a kids chair to be pushed under it. My husband sits on the floor and reaches fine.
I purchased Lego baseplates from Amazon. I went with the Lego Education Building Plates set on Amazon, because it came with the "old school" color green and blue plates in 10x10. I could not find blue plates sold individually online or at the Lego store. I also used the Lego sand baseplate. I used Lego plates as opposed to the Lego compatible.

I laid out the base plates, on the table, the way I wanted them and used legos to connect the plates for the proper placement. THIS IS A VERY IMPORTANT STEP! You can not simply push the plates together and glue, or the Legos will not connect onto other base plates. I, then, determined less than an inch needed to be cut off 1 grey plate and 2 green plates to fit perfectly on the table.

I used a box cutter, laid the plates on the driveway and used Legos as a guide. I just worked my way down. It took about 5 cuts to allow me to break the piece off. Since it was my first time, I was afraid I would ruin Legos by using them as a guide. Now that I know they weren't damaged, I would have used more to avoid alternating them all the way down. I cut the same size strip off 3 base plates.


I then used the cutter to smooth the cut side. It didn't need much.


Lastly, I snipped a tiny piece off the 2 pointy edges to round it out.


I laid the newly cut base plates on the table, connected them with Legos and began to glue. I glued one plate at a time and placed it back in it's position with the Legos keeping it in place. I pressed down firmly and went on to the next plate.

I found the best glue for this project was the Gorilla Super Glue Gel. I figured that out when I ran out of several bottles of the gel pretty quickly and then used original gorilla glue on the rest of the plates. The original gorilla glue expands. It oozed out in some spots and raised a couple of base plates by a tiny amount. The GEL worked perfectly, and did right by this project. The gel was definitely the better glue. I used almost a bottle on an 18x18 plate and more than half a bottle on a 10x10 plate.


Wood table below is 32"x16" and sells for $180 plus $30 in shipping.


Plastic table below is 23" in diameter and sells for $75.00. This is what we used for 3 years.


Our table is 60"x36". I spent $258 on the table and baseplates. This does not include the glue.
I hope this helps you make your own Lego table. You can use any size table, even a coffee table, to come up with your own creation!

November 8, 2016

Mashed Cauliflower

Have you taken the leap from mashed potatoes to mashed cauliflower yet? You've got to try it. Don't get me wrong. I love mashed potatoes. My mom makes the best ones. I also love to eat healthy and enjoy the thrill of making healthy foods taste delectable. This is one of them. Mashed cauliflower tastes sinful, but it's a guilt-free and delicious way to cut calories and lower carbs. One 2 1/2" boiled potato contains about 27g of carbs. 1 medium (5-6" dia) boiled head of cauliflower contains about 23g of carbs. Bonus-It doesn't taste like cauliflower. Your mashed potato loving kids will not know the difference.

We serve mashed cauliflower under sea scallops for a fine dining feel at home. We also serve them with steak or grilled chicken and more vegetables (try them with green beans). Serve them with anything you like having mashed potatoes with!

There are a ton of ways to make it. You can add parmesan cheese, chicken broth, cream cheese, garlic, cottage cheese, or milk. You could simply add some cooking liquid from the cauliflower to thin it out, and that's it! I like to experiment with different ingredients to change it up.

My mom's mashed potatoes have sour cream, cream cheese and butter. We replaced sour cream for plain non-fat greek yogurt many years ago. The yogurt tastes just like sour cream. Yes, we use it on tacos, too. While I absolutely love her recipe, I had to come up with a healthier compliment while achieving a similar flavor.

I share with you the way our family enjoys mashed cauliflower.


hands-on time: 15 minutes
total time: 25 minutes
makes 4 servings


2 medium cauliflower heads, cut into chunks
1/2 cup plain non-fat greek yogurt
2 tablespoons butter
kosher salt & pepper to taste


Bring water to boil. Add cauliflower. Boil cauliflower for 8-10 minutes until tender with a fork. Place in blender with yogurt, butter, salt and pepper. Blend til smooth.


I love this dish. I hope you enjoy it, too!


September 27, 2016

The Ballcap Buddy

We are a ballcap wearing family, and I finally found the best way to clean them!


We would wash our caps in the washing machine, and they would get ruined. So we either bought a new cap (and caps are not cheap) or didn't wash it (and that got gross). I went back and forth with buying a Ballcap Buddy for years. I just didn't like the idea of putting a dirty cap in the dishwasher or wasting money on water to wash it alone. I gave in when hubby so badly wanted his newest cap to be cleaned and not ruined. I bought the Ballcap Buddy, and it saved our favorite caps. It's intended for the top shelf of dishwasher or top load washing machines. It's very specific to not use in front load washing machines. I do the short cycle of dishwasher and take it out to dry by leaving it on the ball cap buddy til dry. Wish I bought it years ago. Better late than never.


This cap was my guinea pig. I figured I couldn't ruin it more than it already was. I went to town with Goop (see GOT GOOP post from 2/27/16), let it sit for 20 minutes and threw it in the dishwasher. Came out brand new. I almost cried.


before
 after

I bought my Ballcap Buddy from the LIDS store for $5.99. Amazon carries them for $7.95 with Prime shipping.
https://www.amazon.com/Original-Ballcap-Buddy-Cap-Washer/dp/B0013FGVW2


I don't know if the type of dishwasher soap makes a difference. I use Cascade Platinum ActionPacs. It is not only amazing on our dishes, it works great on the caps.
https://www.amazon.com/Cascade-Platinum-ActionPacs-Dishwasher-Detergent/dp/B00O7Y9DGW/ref=sr_1_1_a_it?m=ATVPDKIKX0DER&ie=UTF8&qid=1474997343&sr=8-1&keywords=dishwasher+detergent

August 10, 2016

How I lost my pregnancy weight

I gained 54 pounds when I was pregnant. My doctor wasn't concerned. She assured me I would be able to get it off. I didn't believe her. I was always hungry, and I was addicted to Starbuck's. I stopped on my way to work every day in the 2nd and 3rd trimester for a blueberry scone. It was my guiltest pleasure. I ate greens and ate as healthy as I could. I was just ALWAYS hungry.

This was me the night before I checked into the hospital. We went to the Michael Jackson Cirque du Soleil show. People stared. I didn't understand why until I saw this picture after my son was born. I must have looked like I would tip over at any moment. My family had bets on how big baby boy would be. Sweet boy was an average 7 pounds, 8 ounces.


When my son was 3 months, I saw a commercial for Tracy Anderson Metamorphosis. It looked easy enough, and I might get good results. I tried some of her other videos right before I got pregnant, so I didn't get to commit to them as I had done in the past with Tae Bo, Power 90, P90, P90X and Slim in 6. I bought the Metamorphosis Glutecentric version. I was nowhere near my pre pregnancy weight and couldn't fit into any of my clothes. I was very intrigued by the commercial and so bored with the P90's of the world.

I have 2 be clear about 3 things.
1. I tried the eating plan for 2 days. It was disgusting, and I almost passed out in HEB. I decided to stick with my normal daily diet (white & green), because I already enjoyed eating well. I haven't been on a "diet" in over a decade. I consider my daily diet to be the way I normally eat.
2. I don't care what some say about her. I lost my pregnancy weight and another 15 pounds on top of that. The inches kept coming off. She keeps me motivated to move, and I feel powerful after her workout.
3. Her method is not for everyone, and that's ok! Some say they don't like it, without trying it, because they don't want to look like her. Tracy Anderson is 1 of 2 of J Lo's trainers, and J Lo looks like J Lo. The fact is - she gets you moving a way that most don't.

Just as P90 changes the workout to avoid focusing on one group of muscles, Metamorphosis changes to a new workout every 10 days. I admit it was a true dedication for 8 weeks. And it was definitely not as easy as it looked. She advises 6 days a week for 1 hour a day. I worked out 5 days a week for an hour a day for 8 weeks. I was determined. The inches and weight just fell off. I was content with fitting back in my clothes, so I backed off and did 30 minutes a day. At the end of 4 months, I weighed less than my pre pregnancy weight. I'd lost 18 pounds & 17.25 inches and continued to lose more. After another 5 months of 30 minutes a day, 4 days a week, I lost another 6 pounds and more inches.

Metamorphosis comes in 3 dvd's with 90 days of workouts. Tracy Anderson has made years worth of Metamorphosis DVD's, and I still have them delivered to my door. I may be back logged on them, as I do not exercise often enough to keep up with the program...but, Metamorphosis is still the only exercise I do. I feel like a powerhouse when I finish her workouts. I average 30 minutes a day, 5 days a week with some form of physical activity. Some of those days may be kicking the soccer ball with my son for 30 minutes. Then I'll catch one of her dance or exercise clips on instagram and get excited for a 30 minute workout the next day. When I do pop in her exercise video, I pick up from wherever I left off.

Whatever you choose to do as your exercise routine, just get moving! Exercise can help or prevent health problems, improve your mood, boost your energy, promote better sleep, and can be a fun way to spend time with your family.